
Data modes with the KX3
Setting up the Elecraft KX3 for data mode communication
Following on from the Yaesu FT-817 data mode set up guide, this page will take you through the steps required to set up and configure the Elecraft KX3 for data mode communication. The configuration of the Elecraft KX3 is a little different, well use the Microphone and headphone sockets to connect to Signalink sound card.
Making this work is relatively simple, it takes a couple of minutes to set up in the field once you've connected this all up a couple of times.
Why use the Tigertronics Signalink sound card? Well, for me it just works and it's easy to set up. I have used both internal and external standard PC sound cards for data modes, but these can be tricky to get working and can suffer from ground loops and fading along with other issues. I'd recommend the Signalink to keep things simple.

Hardware and software required for data mode communication
In this guide the following items are used:
- HRD-Ham Radio Deluxe
- Signalink USB (order with SLUSBKX3 leads)
- USB lead
- Window PC
- Elecraft KX3 radio
- HF antenna
Configure the Signalink before connecting
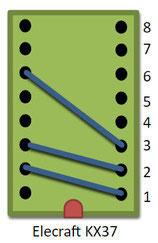
Before connecting up, do ensure that your SignaLink is is configured correctly, this will involve taking the unit apart. It should have come with clear instructions on how to do this, alternatively go to the Tigertronics website for help.
There are four socket head screws on the front of the unit to remove, this allows you access to the configuration socket. Configuration is no problem and should not be too difficult to do. New units are supplied with precut link wires which work just fine. Alternatively there are pre-configured adapters available which will slot right in and eliminates the need for link wires.
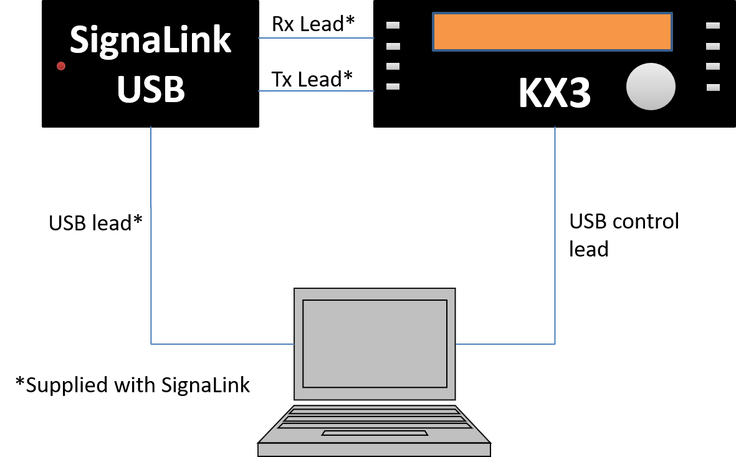
Connecting up the Elecraft KX3 and Signalink
Connect your Signalink, PC and radio as follows:

Configure your PC to work with the Signalink sound card
You'll need to install the driver and setup your Signalink sound card levels on your PC as described here: http://www.tigertronics.com/index.htm . It's easy to do and should not cause too many problems.
Setting up the Elecraft KX3 and Signalink
Switch on the KX3 and check your settings as shown below:
Menu settings:
- Mode set to: USB
- Set power to: 5 Watts (to begin with)
- Switch off all filters
- Gain to 100%
- Audio to 50%
- Mic gain to 50%
Signalink:
- Set all dials to 50%
- Switch on
Run HRD and load DM780
- Fire up HRD and open the DM780 module
- Click on 'Options', then select PTT
- Ensure PTT is set to 'None' - via soundcard PTT or radio VOX
- Then select 'SoundCard'
- Make sure the HRD is configured to use the SignaLink sound card (not the PC sound card):

Getting ready for a QSO
- Select your desired frequency to use at the bottom of the screen (40m is a good starting point)
- Ensure the radio is set to USB mode
- Your screen should look something like this:
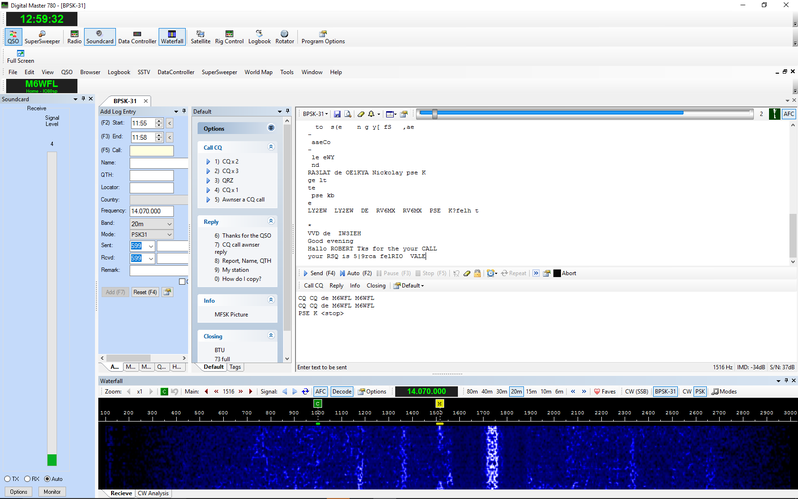
Trim the transmit and receive levels on the Signalink
- Adjust the RX knob on the Signalink so the waterfall displays good clear data streams. The Elecraft KX3 volume knob should have no effect.
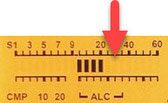
- When transmitting, adjust the TX knob on the Signalink so that the last ALC bar is just starting to flash (you may need to slightly move the Mic gain dial on the KX3 to show this).
- You may have to adjust the transmit levels regularly depending on frequency and power settings, so do keep an eye on this.
- That's it. You should be ready to make a CQ call.
Return to the QSO Shack Homepage.