
Make an awesome Go-box for your radio
Why do you need a Go-box? If you've operate from temporary location, you may have noticed how much time is spent getting everything packed up ready, then setting up, and packing up again when it's time to leave. A Go-box can help solve this problem!
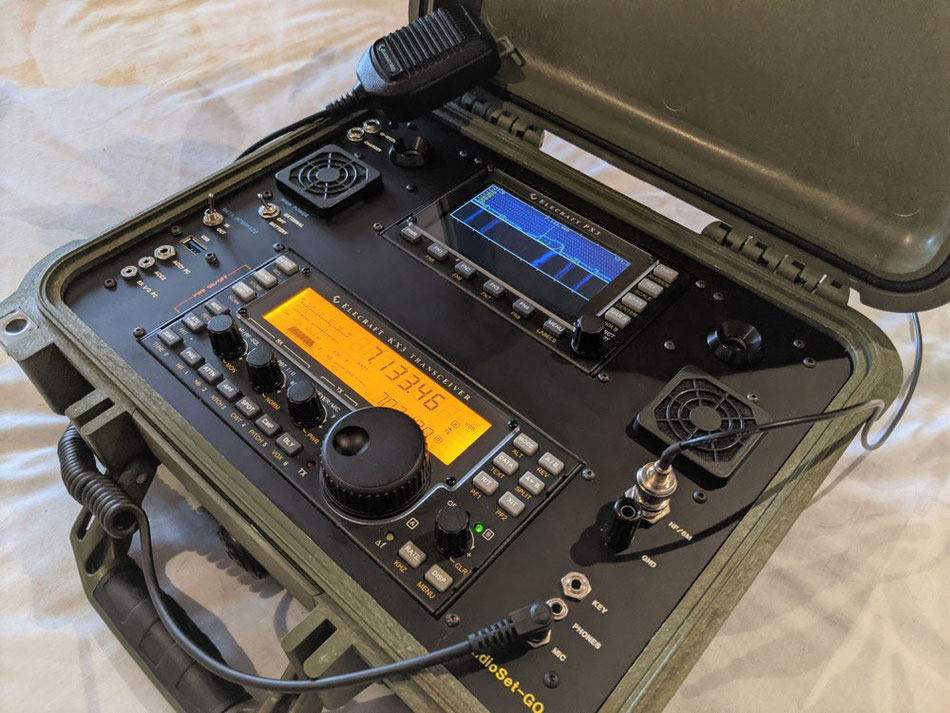
A go-box is a box containing all of your mandatory radio equipment, pre-connected, preferably with batteries. It's a complete shack in a box, just lift the lid, connect an antenna and you're on the air.
They are obviously are a little bigger and heavier than a radio on it's own. But, who ever carries just a radio? Also, this reduces the risk of forgetting something.
So whats the catch? Go-box solutions can be expensive, and although available, there are not that many on the market.
On this page I'm going to share how I went about creating a professional Go-box with a lot of help from Radioset-Go
This KX3 Go-box is based on the professional Radioset-go products
My Go-box example is based on the brilliant Radioset-go box website run by Hanz W1JSB: https://radioset-go.com/prestashop/index.php.
Hanz normally offers full kits or completed retro-fit builds of his RadioSet-Go boxes. He'll even make customized version based on your own particular needs. These are the best on the market, high performance, well designed and robust.
I purchased a reduced set of 'key' parts from Hanz which included the facia, fittings, but excluded the wires, box and batteries.
Now, to be clear, I would strongly recommend buying the completed product, or the full kit of parts from Hanz. These products are of a very high standard and well worth the investment.
The complexity and time required to wire up a Go-box without the full kit can be underestimated. The need for screened cable terminations and good soldering skills is essential. So buy the full kit is you are not confident with these things.
I however, am a glutton for punishment and decided to save a couple of bucks and wire this up myself.
Parts list
I emailed Hanz at Radioset-Go and asked if he could provide a scaled down kit of parts to help reduce costs. I had to source some parts locally to complete the build. Here are the items required:
Purchased from Radioset-Go
- Custom control panel
- 2 speakers with covers
- 2 fans with covers
- M3 standoffs for Pelican 1400
- USB panel mount/extension
- Fan controller PCB
- Audio amplifier PCB
- Heatsink for KX3 (required due to size)
- Aluminium rods, for mounting brackets
- BNC jumper
- Power sockets
- Ground terminal binding post
- 3.5mm sockets
- 3.5mm plugs
- 2x2 header
- Power plug
- Misc. hardware
Purchased locally
- Pelican 1400 box
- Fan splitter 'y' cable
- 4 core screened audio cable
- Sticky cable tie pads x 4
- Small cable ties
- Assorted heat shrink
Battery option
- 12v 6800mAh Rechargeable Li-ion Battery Portable Power Pack
- M3*20mm Stand off
- M3*10mm Button head Allen bolt
- Female 5.5mm x2.1mm DC lead
- Male 5.5mm x2.1mm DC lead
Tools
- 1/16 allen key
- Allen key for M3 bolts
- Small spanner set
- 3mm drill bit
- Soldering kit
- Heat gun
- Low tack masking tape
KX3 and PX3 preparation - these have to be standardized
Standard Elecraft KX3 and PX3 side plates have to be installed before mounting to the new pannel. My aftermarket side plates were just too big. Aftermarket side plates and heat sinks were removed and the KX3 and PX3 was put back to its standard configuration.
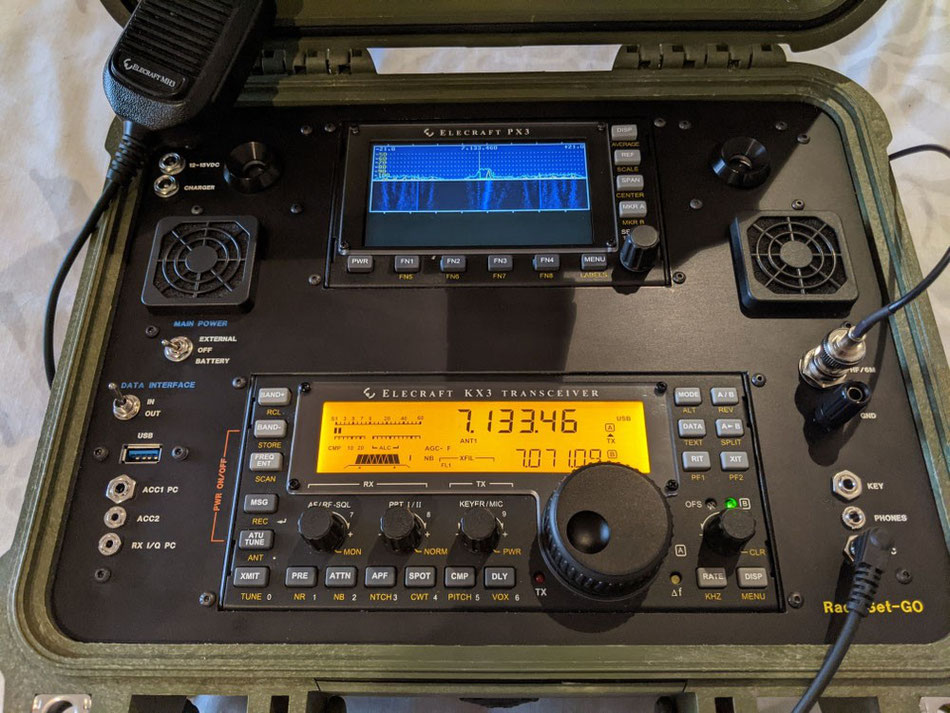
Cooling the radio
Keeping the KX3 radio cool is very important, a solution for this is needed or the radio will simply overheat in a contained space.
The RadioSet-Go kit comes with two silent, but powerful variable fans, one sucks, one blows. These fans work together to create an airflow across the radio.
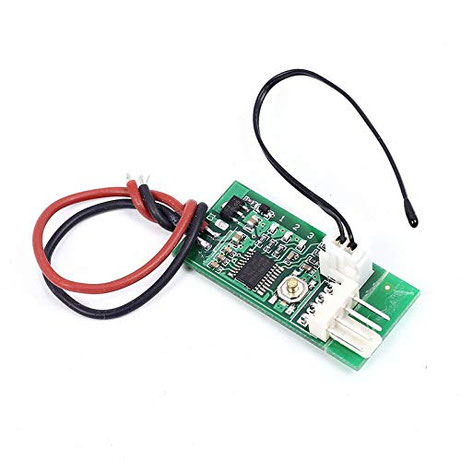
- PWM 4-Wire Fan Temperature Controller
A new KX3 heat-sink is also provided in the kit, this new heat-sink comes with a thermal couple installed to sense radio temperature. A simple fan speed controller is then used to drive and control the cooling fans.
The fan controller has one socket, so a purpose made fan splitter lead was used to allow both fans to be driven.
This works very well.
Audio system in the Go-box
There are two powerful, high clarity speakers provided in the kit. These are driven via an amplifier board which gives the audio a real kick and makes good use of the stereo sound from the KX3.
- PAM8610 15W Two Channel Stereo Class D Audio Amplifier Board Module
There is an issue here, the speakers pop when they are first switched on. The audio board comes with a muting circuit built in, so I am still working on how to eliminate the switch-on pop.

The build
Before starting, I covered the fascia with low-tack masking tape. This helped prevent damage during construction. I peeled away sections of tape as I fitted each item.
Mounting the KX3 and PX3
The first stage is to dry fit the KX3 and PX3 to the facia panel. Using the mounting bar provided, I marked the mounting holes, drilled and deburred. Accuracy is very important here. I did allow some play to accommodate my poor drilling. This appeared to work well.
Tip: The seating height of the equipment is important, this requires a little care to get flush with the facia. The Radioset-Go mounting bars provided in the kit were pre-marked with the correct height for the holes.
Once done, I loose fitted the metal mounting bars to the radio and pan-adapter. I offered the radio and pan-adapter up to the facia and mark out the holes. Again, drilled, deburred. Then fitted all of this this to the facia.
At this stage I had the radio's firmly fitted to the facia.
Fittings - Sockets, fans and switches
Using great care, and the correct tools, I mounted all the fittings to the facia panel.
The fans are mounted in different directions to encourage an air flow, across the radio heat-sink. Everything else is straightforward enough. I left fitting the standoffs out at this stage to avoid damage.
I now had all the harware fitted to the facia panel.
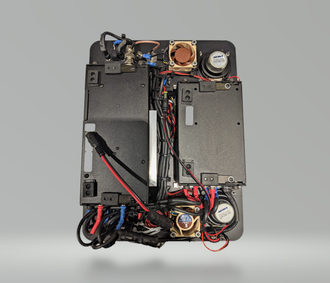
Wiring up
There are a lot of wires. Terminating all of these cables will take time. Most terminations are for screened cables, so you'll need to learn how to do this properly if you're not sure.
There are essentially four wiring systems to consider :
- Power
- Cooling
- Signal connections
- Audio
I began by pre-cutting the cables to size and laying them on the back of the facia panel, this allowed me to make a simple loom assembly. Trying to keeping things neat was essential.
When I was happy with the cable runs, I started terminating the ends. Buzzing out each cable was important, it would difficult to fault find at the end, so this was done as I went along.
When I was happy with a set of cables, I would remove the original tie wraps and incorporate subsequent wires in to the original wiring harness, slowly building up a chunky and robust wiring loom.
The power cables used are just 12v red and black wire. All other cables are higher grade screened cables. I used two sticky pads to provide anchor points for the wiring harness.
I now had a fully connected system ready for testing.
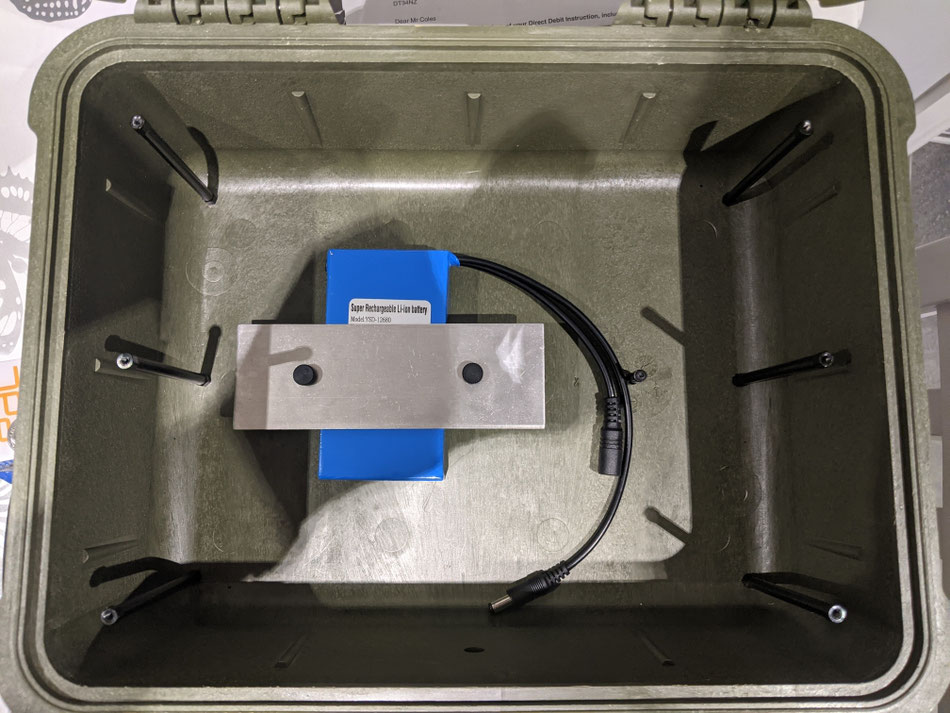
Battery and power
I used a Li-Ion battery solution for my go box. This battery comes pre-fitted with short circuit protection, power and charging leads, they are easily available, the form factor works well. Most importantly these batteries have simple charging requirements, my battery was supplied with it's own charger.
The front panel has a switch to simply change between external and internal power. There is a separate charging port which can remain plugged in if you want to do this.
There is a problem with this battery pack, it has an LED fitted which stays on all of the time. I would recommend very carefully disconnecting this LED to prevent premature discharge of your battery.
Mounting the fascia to the box
The fascia is mounted to the box using six standoffs which are provided in the kit. These are held in place using M3 screws, these could be easily substituted for M3 thumb screws if needed.
KX3 Go-box conclusion
I just love this shack in a box. I can grab this Go-box and just get going. Perfect for field days, temporary locations, and special events. Before the KX3 Go-box setting up the KX3 could be daunting. Loosing all those KX3 wires is a dream. I now enjoy this radio much more in this improved, simpler configuration.
Wiring all this up was not a small job and it took some time to complete this. However, it was worth the effort.
I am very happy with this project, I have great shack in a box which turns heads and just looks darn cool.
Return to the QSO Shack Homepage.