
Fit a dual-band transceiver to your car
Having a transceiver in your car can be useful and fun to listen to local repeaters during those long journeys. With VHF/UHF, height and location makes a huge difference to range and coverage, so being mobile really opens the potential of these bands.
Many of us would like to avoid hacking in to wires or drilling holes in our cars if possible. These things can devalue a car, or worse, permanently damage it. So if possible, cutting into a cars vital systems or structure should be avoided.
So how can you fit a dual band to your car without cutting holes or interfering with the wiring? This page aims to share my experience of fitting a IC2730 to my family saloon car. No cutting, drilling, or soldering was used to achieve this robust and reliable transceiver installation.

What you'll need to add a transceiver to your vehicle
Here's a list of recommended items:
- A dual band vhf/uhf car radio, preferably with a detachable fascia (like an IC 2730)
- Dual-band magnetic mount antenna with feeder line
- Sucker mount for the fascia panel (I used a modified mobile phone mount)
- Velcro, sticky backed (for fitting the radio)
- Cable ties
- Sticky hook, for the microphone mount (these are normally used in the house for temporarily hanging pictures etc.)
- Piggy back fuse holder - This plugs into your regular fuse box, and provides an additional fused supply.
- Ring terminal (for the ground connection)
Mount the radio equipment to your vehicle

The first thing to do is to fit the big items to the car. Before starting, locate your fuse box, then you can think about the best location for all the other 'movable' items:
Radio
For me, the radio fitted nicely under the drivers seat, I found that sticky backed Velcro was perfect for securing the radio to the floor of the car. No drilling was required.
Antenna
The antenna obviously goes on the roof, the antenna cable fitted nicely over the boot seal with no issues. This is how the cable makes it's way into the car.
Radio fascia
The radio control panel is fitted to the windscreen using a mobile phone mount. The mounts for my ICOM radio are very expensive, so a mobile phone mount worked just fine for me. I had to modify the phone mount a bit, but this approach saved me a fortune.
Microphone hook
For the microphone mount I used a regular sticky hook that is usually used in the home, perfect for the job.
Routing the wires to your transceiver
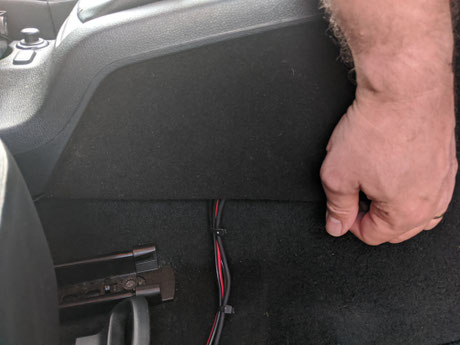
I found all the wires could be tucked under the trim or carpet up to the dashboard. Then it was just a case of running the cables behind the dash through to their end locations.
The antenna cable easily passed over the rear hatchback seal, then under the rear seats to the centre console.
Once the cable runs were in place, a couple of cable ties were used to tidy things up where needed.
Again, no cutting or drilling was needed.

Connect your UHF/VHF radio to a 12V supply
Most of the connections are obvious, but the power connection is a different matter. I used a piggy back fuse to provide the supply. Using a piggy back fuse is a lot easier, this type of fuse holder provides a 12v supply directly from your fuse box, no cutting or soldering is required.
In the image you'll see how this was used to get the radio supply, in my case there was an empty fuse slot making things even easier.
Use a multimeter set to volts to help identify the best location to fit your piggy-backed fuse.
The ground wire was terminated using a ring terminal, this was fixed to a suitable bolt near the fuse box.
All of the wires were secured with cable ties and protected from chafing where needed. Excess wire was bundled up and cable tied up. I did not remove excess wire to allow me to remove the radio at a later date and fit in another vehicle.
The IC2730 has an automatic power off, so I used a permanent 12V supply as recommended in the user manual. A switched supply was also available in the fuse box so you will need to decide which type of supply to use.
The end result
I'm very happy with how this all fitted into my car. Having a radio with a detachable fascia really helps the installation as all the dials and buttons can be placed in the best location. Most importantly, this entire installation can be removed without any damage to the car or equipment.
I found that the speaker (in the radio body) being under the seat worked just fine most of the time, although I did have the option of connecting this to the aux I/P of my car radio if needed. But other than that, this installation works just fine for me.

Return to the QSO Shack Homepage.